Upgrade to DS 7: #1 What’s Changed

ForgeRock logo This is post 1 of a series of 3 on upgrading servers to ForgeRock Directory Services 7.

DS 7 is a major release, much more cloud-friendly than ever before, and different in significant ways from earlier releases.

To upgrade successfully, make sure you understand the key differences beforehand. With these in mind, plan the upgrade, how you will test the upgraded version, and how you will recover if the upgrade process does not go as expected:

Fully Compatible Replication

Some things never change. The replication protocol remains fully compatible with earlier versions back to OpenDJ 3.

This means you can still upgrade servers while the directory service is online, but the process has changed.

In 6.5 and earlier, you set up DS servers that did not yet replicate. Then, when enough of them were online, you configured replication.

In 7, you configure replication at setup time before you start the server. For servers that will have a changelog, you use the setup --replicationPort option for the replication server port. For all servers, you use the setup --bootstrapReplicationServer option to specify the replication servers that the server will contact when it starts up.

The bootstrap replication servers maintain information about the servers in the deployment. The servers learn about the other servers in the deployment by reading the information that the bootstrap replication server maintains. Replicas initiate replication when they contact the first bootstrap replication server.

As directory administrator, you no longer have to configure and initiate replication for a pure DS 7 deployment. DS 7 servers can start in any order as long as they initiate replication before taking updates from client applications.

Furthermore, you no longer have to actively purge servers from other servers’ configurations. The other servers “forget” a server that disappears for longer than the replication purge delay, and eventually purge its state.

These new capabilities bring you more deployment flexibility than ever before. As a trade off, you must now think about configuring replication at setup time, and you must migrate scripts and procedures that used older commands to the new dsrepl command.

Unique String-Based Server IDs

By default, DS 7 servers use unique string-based server IDs.

In prior releases, servers had multiple numeric server IDs. Before you add a new DS 7 server to a deployment of older servers, you must assign it a “numeric” server ID.

Secure by Default

The setup --production-mode option is gone. All setup options and profiles are secure by default.

DS 7 servers require:

  • Secure connections.
  • Authentication for nearly all operations, denying most anonymous access by default.
  • Additional access policies when you choose to grant access beyond what setup profiles define.
  • Stronger passwords.
    New passwords must not match known compromised passwords from the default password dictionary. Also in 7, only secure password storage schemes are enabled by default, and reversible password storage schemes are deprecated.
  • Permission to read log files.

Furthermore, DS 7 encrypts backup data by default. As a result of these changes, all deployments now require cryptographic keys.

Deployment Key Required

DS 7 deployments require cryptographic keys. Secure connections require asymmetric keys (public key certificates and associated private keys). Encryption requires symmetric (secret) keys that each replica shares.

To simplify key management and distribution, and especially to simplify disaster recovery, DS 7 uses a shared master key to protect secret keys. DS 7 stores the encrypted secret keys with the replicated and backed up data. This is new in DS 7, and replaces cn=admin data and the keys for that backend.

A deployment key is a random string generated by DS software. A deployment key password is a secret string at least 8 characters long that you choose. The two are a pair. You must have a deployment key’s password to use the key.

You generate a shared master key, and optionally, asymmetric key pairs, with the dskeymgr command using your deployment key and password. Even if you provide your own asymmetric keys for securing connections, you must use the deployment key and password to generate the shared master key.

When you upgrade, or add a DS 7 server to a deployment of pre-7 servers, you must intervene to move from the old model to the new, and unlock all the capabilities of DS 7.

New Backup

As before, backups are not guaranteed to be compatible across major and minor server releases. If you must roll back from an unsuccessful upgrade, roll back the data as well as the software.

When you back up DS 7 data, the backup format is different. The new format always encrypts backup data. The new format lets you back up and restore data directly in cloud storage if you choose.

Backup operations are now incremental by design. The initial backup operation copies all the data, incrementing from nothing to the current state. All subsequent operations back up data that has changed.

Restoring a backup no longer involves restoring files from the full backup archive, and then restoring files from each incremental backup archive. You restore any backup as a single operation.

The previous backup and restore tools are gone. In their place is a single dsbackup command for managing backup and restore operations, for verifying backup archives, and for purging outdated backup files.

Upgrade Strategies

When you upgrade to a new DS version, you choose between in-place upgrade, unpacking the new software over old, then running the upgrade command, or upgrade by adding new servers and retiring old ones.

Keep Reading

Now that you understand the key differences in DS 7, try a demo or two:
Upgrade to DS 7: #2 Add New Servers

ForgeRock logo This is post 2 of a series of 3 on upgrading servers to ForgeRock Directory Services 7.

If you’ve read the first post in this series, you understand the key differences that you need to know before upgrading.

One option when upgrading DS servers is to upgrade by adding new servers, leaving the service running during upgrade. Once you finishing adding new servers, and are satisfied with the result, you retire old servers and clean up the new servers to access the newest features.

This process makes it easier to phase out old systems, and might speed up rollback, if necessary. It involves more systems during the upgrade, requires initializing new replicas, and calls on you to reconfigure new servers to align with the older servers. You must manually enable new features after upgrade.

This demonstration installs two DS 6.5 replicas, adds three new DS 7 servers to the deployment, and then cleans up after upgrade, removing the DS 6.5 servers.

IMPORANT: This demonstration is intended as an example.
You must test your own version in a non-production environment before deploying to production.

The demonstration is self-contained, and expected to run in a Bash terminal on your computer. It was written on Ubuntu 20.04 with OpenJDK 8 and 11, installing servers in /path/to. Edit the scripts, if necessary, to try the demo on your computer.

Install Two DS 6.5 Servers

Download the setup script so you can try this yourself. Before you run the setup as is, download DS 6.5 in .zip format.

The setup script installs two DS 6.5 servers that are both directory servers and replication servers. The script configures the servers with the DS evaluation profile (base DN: dc=example,dc=com), and uses Java 8. (DS 6.5 also supports Java 11, but DS 7 supports only Java 11 as of this writing).

After installation, the servers are running, and replicating with each other:

PathPortsCredentials
/path/to/ds-rs-111389 11636 14444 18443 18989cn=Directory Manager:password cn=monitor:password
/path/to/ds-rs-221389 21636 24444 28443 28989cn=Directory Manager:password cn=monitor:password
uid=Admin:password

Add Three DS 7 Servers

Before you run the script to add servers as is, download DS 7 in .zip format.

The script installs these servers that use Java 11:

  • /path/to/ds-rs-7: A DS 7 server with the evaluation profile that is a directory server and a replication server.
  • /path/to/ds-7: A standalone DS 7 directory server with the evaluation profile.
  • /path/to/rs-7: A standalone DS 7 replication server.

Server IDs

Notice that the server IDs are numbers. The existing deployment uses numeric server IDs.

New Security Model

The new servers’ keys rely on a deployment key. You generate your deployment key with the dskeymgr command and the deployment key password of your choice. Keep the deployment key password secret. The scripts use a demonstration deployment key that was generated with password as the password, and should only be used for this demonstration.

Configuration Compatibility

Before starting the new servers, the script adapts their configurations for compatibility with DS 6.5. In this case, with servers installed with the evaluation profile and no other changes, the only adaptations required are to enable the PBKDF2 and Slated SHA-512 password storage schemes. In DS 7, these password storage schemes are disabled in favor of strong default schemes.

Real-world deployments may well require additional configuration adaptations. DS 7 configures servers to be secure by default. To determine what you must do, compare your DS 6.5 configuration with a fresh DS 7 configuration. It may help to read the DS 6.5 config.ldif alongside the DS 7 config.ldif, entry by entry. This is perhaps the most difficult part of upgrading by adding servers.

Add to Deployment

The script adds the servers to the existing deployment, starts them, and initializes replication from ds-rs-1:

PathPortsCredentials
/path/to/ds-rs-731389 31636 34444 38443 38989uid=admin:password cn=monitor:password
/path/to/ds-741389 41636 44444 48443uid=admin:password cn=monitor:password
/path/to/rs-751389 51636 54444 58443 58989uid=admin:password cn=monitor:password

When initializing replication, the script overwrites DS 7 schema with 6.5 schema for compatibility.

While the upgrade is in progress, replication monitoring is split between the older servers, which use dsreplication status, and the newer servers, which use dsrepl status. Run both commands to get a more complete picture of replication status.

Remove 6.5 Servers and Clean Up

After you finish rolling out new servers, and are satisfied with the results, you retire older servers, and then clean up the configuration of your new servers. The cleanup process is optional, but recommended. It aims to bring the deployment in line with current best practices, and unlocks new features.

Removal of 6.5 Servers

The cleanup script stops and removes the two DS 6.5 servers.

Cleanup Command

Once only DS 7 servers remain, the script runs a dsrepl cleanup-migrated-pre-7-0-topology command. This is the first step of the cleanup process, limiting the dependency on the old security model based on cn=admin data and ADS keys:

Removing administrators from admin backend ..... Done
Cleaning and updating configuration of server localhost:34444 ..... Done
Cleaning and updating configuration of server localhost:54444 ..... Done
Cleaning and updating configuration of server localhost:44444 ..... Done
Removing servers from admin backend ..... Done
Removing instance keys from admin backend ..... Done

All servers have been cleaned

The command is conservative about cleanup. It does not remove cn=admin data, because the deployment depends on the secret keys in the backend to decrypt any data in the deployment that has been encrypted. This includes passwords stored with reversible password storage schemes, encrypted backends, and encrypted backup archives.

Schema Files

As described above, the previous script overwrites DS 7 schema with 6.5 schema for compatibility. The cleanup script reverses that process, replacing older configuration schema with DS 7 templates. Before you do this in production, review the differences in your schema files.

Admin Data

If you are sure that your deployment does not use encrypted data, then you can remove cn=admin data and the ADS keys as well, as shown in the script. Otherwise, re-encrypt the data before removing the old keys:

  • Deprecate password policies that use reversible storage schemes, and wait until passwords for all active users are hashed.
  • Export encrypted backends to cleartext LDIF, import with encryption based on DS 7 keys:
    • Make sure you have enough time to export and import in less than the replication purge delay.
    • Export the encrypted backend to LDIF.
    • Stop the server.
    • Remove cn=admin data and related configuration entries from the server configuration.
    • Import the backend from LDIF, overwriting existing data, and encrypting with a symmetric key protected by the shared master key.
    • Start the server.Replication online brings the server up to date for changes that happened while it was down.

Replication Status

After making the changes, the script checks replication status and displays the result.

cn=admin data can still appear in the output, even if you removed the data.

Go Further

At this point, the upgrade process is complete, and the service runs DS 7 servers. You can begin to use new DS 7 features.

You can now make additional changes to your DS 7 deployment, such as switching to string-based server IDs, or deprecating old password storage in favor of more secure options.

To stop and remove the servers you installed, you can use the teardown script.

Upgrade to DS 7: #3 In-Place Upgrade

ForgeRock logo This is post 3 of a series of 3 on upgrading servers to ForgeRock Directory Services 7.

If you’ve read the first post in this series, you understand the key differences that you need to know before upgrading.

The most straightforward option when upgrading DS servers is to upgrade in place. One by one, you stop, upgrade, and restart each server individually, leaving the service running during upgrade.

The in-place upgrade process is simpler to understand, and maintains compatibility with earlier settings. It is slower to roll back if you find a problem late in the upgrade process. You must manually enable new features after upgrade.

This demonstration installs two DS 6.5 replicas, upgrades them in place, and deploys keys required to use the new security model.

IMPORANT: This demonstration is intended as an example.
You must test your own version in a non-production environment before deploying to production.

The demonstration is self-contained, and expected to run in a Bash terminal on your computer. It was written on Ubuntu 20.04 with OpenJDK 8 and 11, installing servers in /path/to. Edit the scripts, if necessary, to try the demo on your computer.

Install Two DS 6.5 Servers

Download the setup script so you can try this yourself. Before you run the setup as is, download DS 6.5 in .zip format.

The setup script installs two DS 6.5 servers that are both directory servers and replication servers. The script configures the servers with the DS evaluation profile (base DN: dc=example,dc=com), and uses Java 8. (DS 6.5 also supports Java 11, but DS 7 supports only Java 11 as of this writing).

After installation, the servers are running, and replicating with each other:

PathPortsCredentials
/path/to/ds-rs-111389 11636 14444 18443 18989cn=Directory Manager:password cn=monitor:password
/path/to/ds-rs-221389 21636 24444 28443 28989cn=Directory Manager:password cn=monitor:password
uid=Admin:password

Upgrade in Place

Before you run the upgrade and cleanup script as is, download DS 7 in .zip format.

In a rolling upgrade, the script stops each server, unpacks the new software over the old, and updates the configuration to use Java 11 before running the upgrade command.

To the extent possible, the upgrade command does not change the server configuration, or the LDAP schema. It aims to preserve compatibility, letting you make configuration changes later at your convenience.

On Cleanup

After you finish rolling out new servers, and are satisfied with the results, you retire older servers, and then clean up the configuration of your new servers. The cleanup process is optional, but recommended. It aims to bring the deployment in line with current best practices, and unlocks new features.

Schema Files

The cleanup process replaces older configuration schema with DS 7 templates. In this case, one of the newer schema files lets you use fully featured and replicated password policies. Before you do this in production, review the differences in your schema files.

New Security Model

When you install a new DS 7 server, you use a deployment key and password to derive at least a shared master key. The shared master key protects secret keys, which are then distributed in the replicated data they encrypt. When you upgrade, however, the servers carry on using the ADS instance key to protect secret keys, and replication of cn=admin data to distribute the keys.

The script adds keys based on a deployment key and password, and changes the server configurations to use them. You generate your deployment key with the dskeymgr command and the deployment key password of your choice. Keep the deployment key password secret. The scripts use a demonstration deployment key that was generated with password as the password, and should only be used for this demonstration.

Cleanup Command

When only DS 7 servers using the new security model remain, the script starts the servers, and runs a dsrepl cleanup-migrated-pre-7-0-topology command. This is only part of the cleanup process, limiting the dependency on the old security model based on cn=admin data and ADS keys.

The command is conservative about cleanup. It does not remove cn=admin data, because the deployment depends on the secret keys in the backend to decrypt any data in the deployment that has been encrypted. This includes passwords stored with reversible password storage schemes, encrypted backends, and encrypted backup archives.

Admin Data

If you are sure that your deployment does not use encrypted data, then you can remove cn=admin data and the ADS keys as well, as shown in the script. Otherwise, reencrypt the data before removing the old keys:

  • Deprecate password policies that use reversible storage schemes, and wait until passwords for all active users are hashed.
  • Export encrypted backends to cleartext LDIF, import with encryption based on DS 7 keys:
    • Make sure you have enough time to export and import in less than the replication purge delay.
    • Export the encrypted backend to LDIF.
    • Stop the server.
    • Remove cn=admin data and related configuration entries from the server configuration.
    • Import the backend from LDIF, overwriting existing data, and encrypting with a symmetric key protected by the shared master key.
    • Start the server.Replication online brings the server up to date for changes that happened while it was down.

Replication Status

After making the changes, the script checks replication status and displays the result.

cn=admin data can still appear in the output, even if you removed the data.

Go Further

At this point, the upgrade process is complete, and the service runs DS 7 servers. You can begin to use new DS 7 features.

You can now make additional changes to your DS 7 deployment, such as switching to string-based server IDs, or deprecating old password storage in favor of more secure options.

To stop and remove the servers you installed, you can use the teardown script.

Intelligent Authn and more

ForgeRock Access Management (AM) 6.5 brings many new features and improvements: support for standard Web Authentication (WebAuthn), more built-in intelligent authentication nodes, support for secret stores including keystores, file-based stores, and HSMs, as well as CTS and OAuth 2.0/OpenID Connect enhancements.

The AM 6.5 docs are the best yet. Highlights:

  • The new Authentication Node Developer’s Guide shows you how to develop and maintain your own intelligent authentication nodes in Java for use alongside built-in nodes and third-party nodes from the marketplace. (New to authentication nodes and trees? In a nutshell, AM 6 and later let you use decision trees to create authentication journeys that best fit any use case. For more, start with this blog.)
  • The OAuth 2.0 Guide for 6.5 has improved a lot, making it easier to understand and use OAuth 2.0 features in AM (even if you haven’t read all the RFCs ;-). The guide now helps you decide quickly which flow to use for your case. The descriptions and instructions for flows have been reworked for you to find what you need fast.
  • The AM 6.5 docs release includes 40 improvements and new features and over 100 fixes and updates, many in response to questions from readers. So please continue to send your feedback, which you can do directly from the docs as you read them. (Click at the top right to start.)

DevOps docs leap forward

The ForgeRock DevOps docs for 6.5 add a lot beyond version 6. Not only do the 6.5 DevOps Developer’s Guide (formerly DevOps Guide) and Quick Start Guide cover everything they addressed in 6, you now get much more guidance:

  • The Start Here roadmap gives you an overview of all docs.
  • The Release Notes bring you up to date quickly from the previous release.
  • The CDM Cookbooks bring you the Cloud Deployment Model, a recipe for common use of the ForgeRock Identity Platform in a DevOps environment. At present, ForgeRock publishes cookbooks for Google’s cloud and Amazon’s cloud, relying on Kubernetes for orchestration in both clouds. Make sure you read through to the Benchmarking chapter, where you will learn what it cost ForgeRock to run sample deployments in the real world.
  • The Site Reliability Guides cover how to customize and run the deployments in the cloud of your choice.

Congratulations to everyone in the cloud deployment team on an impressive release, and especially to Gina, David, and Shankar for a great doc set!

Documenting ForgeRock DS HTTP APIs

ForgeRock Logo This post is part of a series about how to get live reference documentation for ForgeRock REST APIs.

ForgeRock DS directory servers do not enable the CREST APIs to directory data by default, since you must first adapt the REST to LDAP mapping for your data. To get started with REST to LDAP, see To Set Up REST Access to User Data.

In the end, make sure that the API is enabled before trying to read its descriptor. For example, you can enable the default /api endpoint with the following command (adapted for your installation):

/path/to/opendj/bin/dsconfig \
 set-http-endpoint-prop \
 --hostname opendj.example.com \
 --port 4444 \
 --bindDN "cn=Directory Manager" \
 --bindPassword password \
 --endpoint-name /api \
 --set enabled:true \
 --no-prompt \
 --trustAll

The ForgeRock DS product does not currently include an API explorer, but you can get the OpenAPI-format API descriptor for any or all CREST endpoints. You pass the _api query string parameter to the endpoint. The resulting OpenAPI descriptor is a JSON document. Get available CREST APIs for directory data with a request to the /api endpoint:

curl -o ds.json -u kvaughan:bribery http://localhost:8080/api?_api

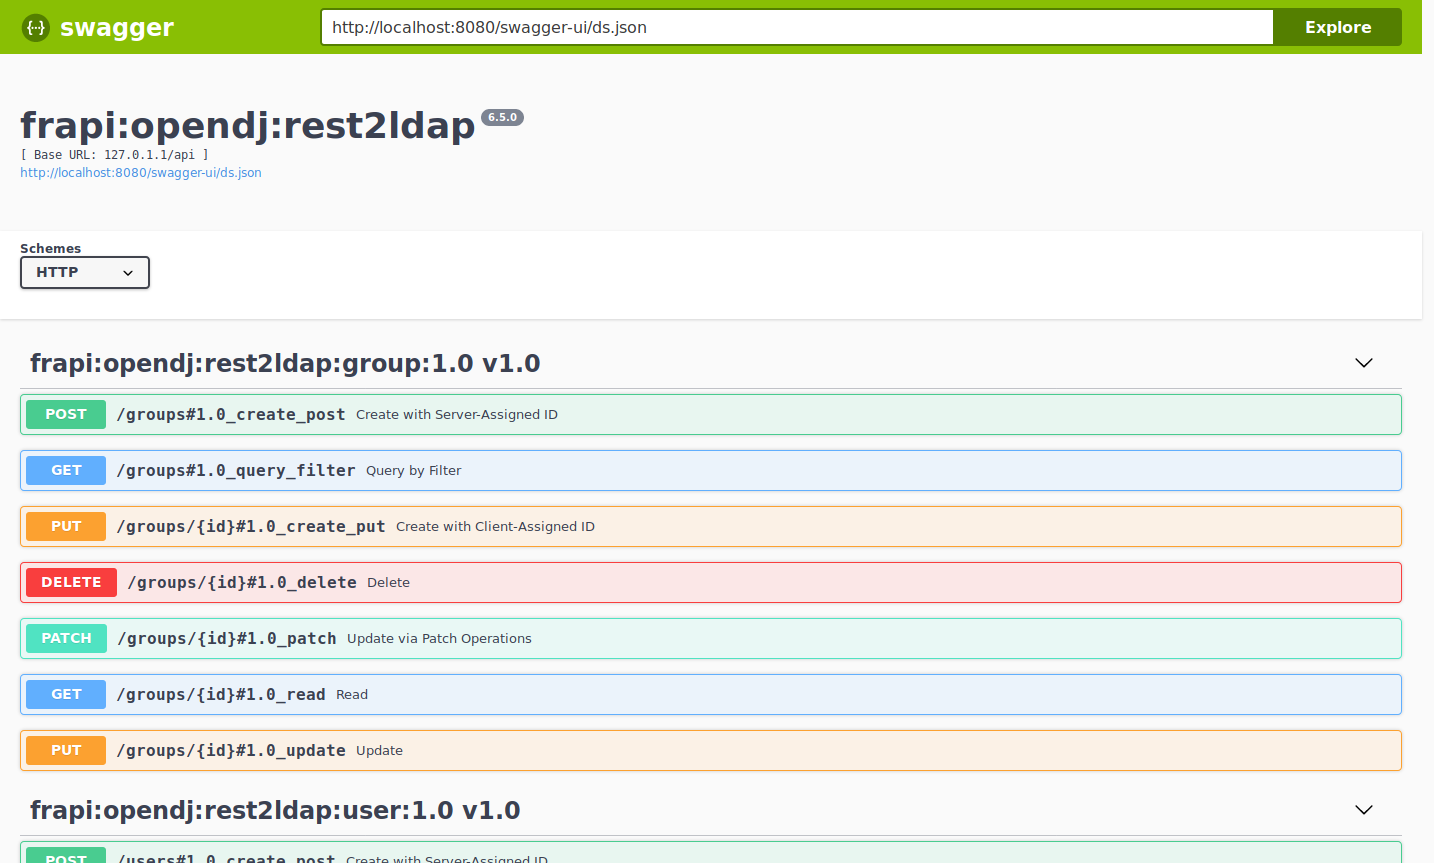
To try out the result, download and install Swagger UI, then move the JSON document into the Swagger UI directory. You can then browse the Swagger UI with ds.json as the descriptor:

DS Swagger UI.png

The API descriptor that you load from the server no doubt does not exactly match what you need to publish in your live documentation. Use the Swagger Editor to adapt it to your needs:

DS Swagger Editor.png

For more information, see Working With REST API Documentation.

Documenting ForgeRock IG HTTP APIs

ForgeRock Logo This post is part of a series about how to get live reference documentation for ForgeRock REST APIs.

The ForgeRock IG product does not currently include an API explorer, but you can get the OpenAPI-format API descriptor for any or all endpoints. You pass the _api query string parameter to the endpoint. The resulting OpenAPI descriptor is a JSON document. For example, you can start IG in development mode as described in Starting IG, and then get all available APIs with a request to the /openig/api endpoint:

curl -o ig.json http://localhost:8080/openig/api?_api

To try out the result, download and install Swagger UI, then move the JSON document into the Swagger UI directory. You can then browse the Swagger UI with ig.json as the descriptor:

IG Swagger UI.png

The API descriptor that you load from the server no doubt does not exactly match what you need to publish in your live documentation. Use the Swagger Editor to adapt it to your needs:

IG Swagger Editor.png

For more information, see Understanding IG APIs With API Descriptors.

Using the ForgeRock IDM API Explorer

ForgeRock Logo This post is part of a series about how to get live reference documentation for ForgeRock REST APIs.

The ForgeRock IDM web-based console includes an API explorer.

The API explorer lets you try out the CREST HTTP APIs as you are building your service. You access the IDM API explorer from the question mark menu in the console. IDM makes many categories of endpoints available. The following example shows the Health category expanded:

IDM browse explorer.png

You can quickly try out one of the API calls. For example, expand /health/memory, and then click the Try it out and Execute buttons:

IDM try health memory endpoint.png

Notice that the API explorer displays everything but the credentials needed to access the REST API.

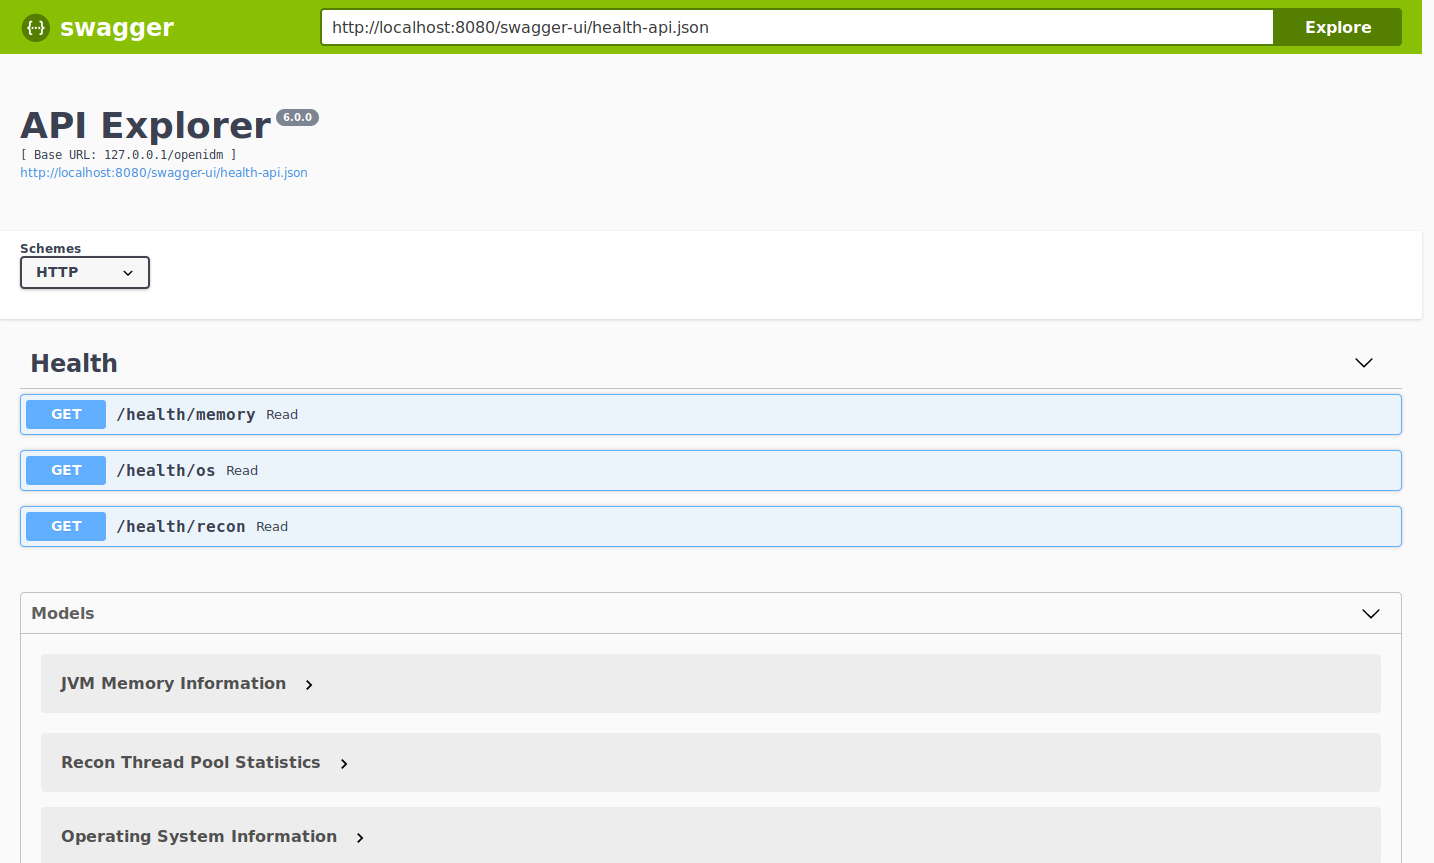
You can also get the OpenAPI-format API descriptor for the /health endpoint. You pass the _api query string parameter to the endpoint. The resulting OpenAPI descriptor is a JSON document:

curl -u openidm-admin:openidm-admin -o health-api.json http://localhost:8080/openidm/health?_api

To try out the result, download and install Swagger UI, then move the JSON document into the Swagger UI directory. You can then browse the Swagger UI with health-api.json as the descriptor:

IDM Swagger UI.png

The API descriptor that you load from the server no doubt does not exactly match what you need to publish in your live documentation. Use the Swagger Editor to adapt it to your needs:

IDM Swagger Editor.png

For more information, see API Explorer.

Using the ForgeRock AM API Explorer

ForgeRock Logo This post is part of a series about how to get live reference documentation for ForgeRock REST APIs.

The ForgeRock AM web-based console includes an API explorer. The API explorer lets you try out the CREST HTTP APIs as you are building your service.

You access the AM API explorer from the question mark menu in the console:

AM API explorer.png

By default, there are many APIs published in the top-level realm. A simple one that you can try right away when logged in as AmAdmin is an action on the /sessions endpoint. Click /sessions in the left menu, scroll down, and click /sessions#1.2_query_id_all:

AM browse API explorer.png

Next, scroll to and click the Try it out! button:

AM try sessions endpoint.png

Notice that the API explorer displays everything but the AM SSO details that your browser is using to authenticate with your AmAdmin session.

Suppose you want to get the OpenAPI-format API descriptor for the /sessions endpoint. You pass the _api query string parameter to the endpoint. The resulting OpenAPI descriptor is a JSON document:

curl -o sessions-api.json http://openam.example.com:8080/openam/json/sessions?_api

To try out the result, download and install Swagger UI, then move the JSON document into the Swagger UI directory.

For example, copy the Swagger UI dist folder into the same Apache Tomcat server used by OpenAM, add the descriptor, and restart Tomcat:

unzip swagger-ui-version.zip
cp -r swagger-ui-version/dist /path/to/tomcat/webapps/swagger-ui
mv sessions-api.json /path/to/tomcat/webapps/swagger-ui/
/path/to/tomcat/bin/shutdown.sh
/path/to/tomcat/bin/startup.sh

Now browse http://openam.example.com:8080/swagger-ui/ with http://openam.example.com:8080/swagger-ui/sessions-api.json as the descriptor:

AM Swagger UI.png

The API descriptor that you load from the server no doubt does not exactly match what you need to publish in your live documentation. Use the Swagger Editor to adapt it to your needs:

AM Swagger Editor.png

For more information, see Introducing the API Explorer. For details about authenticating to use the APIs outside the console, see Authentication and Logout.

About REST APIs and API Descriptors

ForgeRock Logo This post briefly describes the types of HTTP APIs available through the ForgeRock platform, and which ones come with live reference documentation.

The following categories of HTTP APIs are available in the ForgeRock platform:

ForgeRock Common REST (CREST) APIs

ForgeRock Common REST provides a framework for HTTP APIs. Each of the component products in the platform uses CREST to build APIs that do CRUDPAQ operations in the same ways.

ForgeRock platform component products generate live reference documentation in a standard format (Swagger, which has been standardized as OpenAPI) for CREST APIs. This is done through a mechanism referred to as API descriptors. You can use this documentation to try out the CREST APIs.

Standard HTTP APIs such as OAuth 2.0

Standard HTTP APIs are defined by organizations like the IETF for OAuth 2.0, the Kantara Initiative for UMA, and the OpenID Connect Working Group. These APIs have their own implementations and do not use CREST. They are documented where they are used in the product documentation.

The canonical documentation is the specifications for the standards. At present, the ForgeRock platform components do not generate live documentation for these standard APIs.

Non-RESTful, Challenge-Response HTTP APIs

Some APIs, such as the authentication API used in ForgeRock AM and the user self-service API used in ForgeRock IDM are not fully RESTful. Instead, they use challenge-response mechanisms that have the developer return to the same endpoint with different payloads during a session.

These APIs are documented in the product documentation.

The ForgeRock API reference documentation published with the product docs is, necessarily, abstract. It does not provide you a sandbox to try out the APIs. Unlike a SaaS, with its fixed configuration, the ForgeRock platform components are highly configurable. ForgeRock HTTP APIs depend on how you decide to configure each service.

Live Reference Documentation

It is your software deployment or SaaS, built with the ForgeRock platform, that publishes concrete APIs.

You can capture the OpenAPI-format docs, and edit them to correspond to the APIs you actually want to publish. A browser-based, third-party application, Swagger UI, makes it easy to set up a front end to a sandbox service so your developers can try out your APIs.

Note that you still need to protect the endpoints. In particular, prevent developers from using the endpoints you do not want to publish.

The following posts in this series will look at how to work with the APIs when developing your configuration, and how to get the OpenAPI-format descriptors to publish live API documentation for your developers.